

Repointing is needed now when mortar is missing deeper than about a quarter inch, crumbling under light pressure, or letting water into the wall. If joints look intact but chalky or slightly recessed, you can monitor them and schedule work during a mild season. Active cracking or bulging brick means it's time to call a mason, not wait.
TL;DR:
- Mortar typically needs repointing if it is missing deeper than a quarter inch, crumbling easily, or allowing water into the wall.
- Repointing should be done every 25 to 50 years, with faster deterioration occurring in colder climates, poor drainage, or with older lime-based mortar.
- Proper raking depth of at least three-quarters of an inch and matching mortar strength and breathability are crucial for a durable repair.
- Cracks wider than 1/8 inch, especially diagonal or stair-step patterns, indicate structural issues requiring professional evaluation.
- Best weather for repointing ranges from 40°F to 90°F, with spring and fall being ideal seasons to ensure proper mortar curing.
Table of Contents
- What Are the Signs You Need Repointing?
- How Often Does Brick Need Repointing?
- What Does the Repointing Process Actually Involve?
- Does Mortar Type Really Matter for Repointing?
- Should You DIY or Hire a Mason?
- When Is the Best Time of Year to Repoint?
- How Can You Slow Down Future Repointing Needs?
- A Practical Recommendation on Matching and Timing
- How Heritage Masonry & Brick Handles Repointing in Richmond
- Where to Learn More About Repointing Standards
- Sources
- FAQ
What Are the Signs You Need Repointing?
Mortar rarely fails without warning. It tells you first with texture, then with water, then with structure.
Look for these signals during a walk around your home's exterior:
- Crumbling or powdery mortar that comes away when you scrape it with a key or screwdriver.
- Recessed joints, where mortar has eroded more than a quarter inch behind the brick face.
- Missing mortar in patches, leaving visible gaps between bricks.
- Spalling brick, where the face of the brick itself is flaking or popping off, often a sign that water has been sitting behind failed mortar for a while.
- Damp or discolored interior walls, especially near chimneys or below grade, which usually means water is already getting through.
Crack patterns matter as much as the joint condition. Hairline cracks under about 1/8 inch that stay stable over a season are usually cosmetic. Stair-step cracks, diagonal cracks that widen at one end, or horizontal cracks running along a joint line point toward settlement or structural movement, and those need professional evaluation rather than a patch kit.
Two quick DIY checks help confirm what you're seeing. The scrape test: run a key along the joint. If mortar dust falls away easily, it has lost its bond. The tap test: tap the brick face gently with a hammer handle. A hollow or crumbly sound suggests the brick itself is compromised, not just the joint.
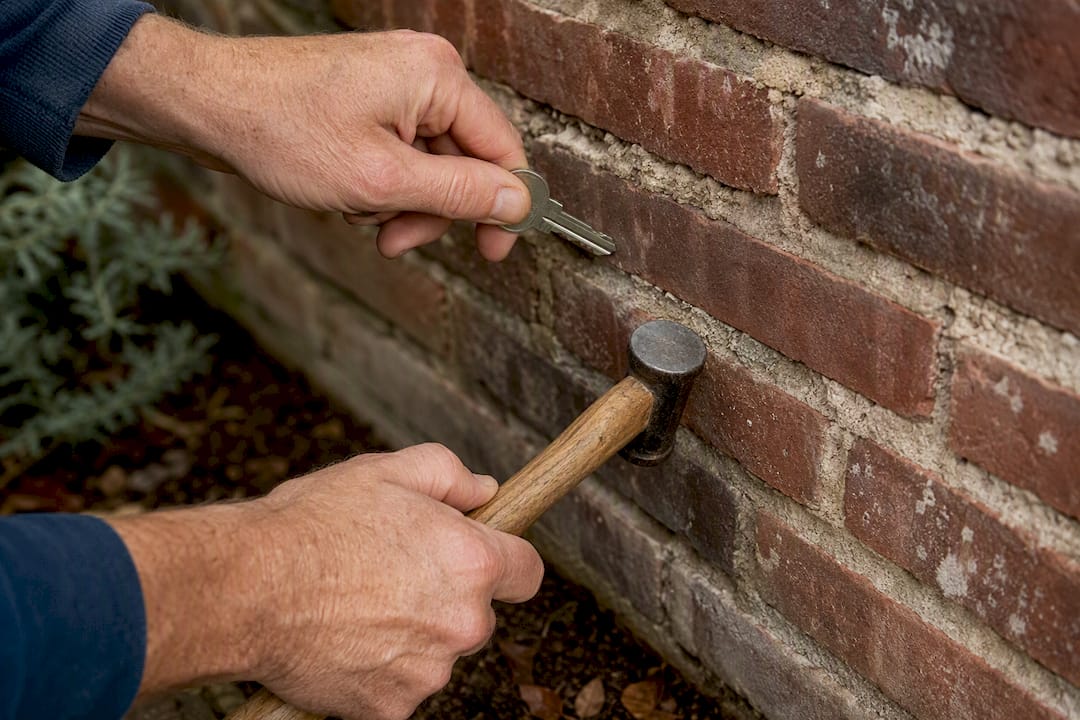
Mortar typically lasts multiple decades before it needs attention, though its lifespan varies greatly depending on exposure and the original mix, according to the Brick Industry Association.
How Often Does Brick Need Repointing?
Most homes need full repointing somewhere between 25 and 50 years after the last job, but that number moves depending on your climate, your original mortar, and how well water has been managed around the foundation.
Several factors shorten that window:
- Freeze thaw cycles in colder climates push water into small gaps, then expand it as ice, widening cracks year after year.
- Poor drainage or grading that keeps soil or water in contact with the base of a wall accelerates erosion at the lowest courses.
- Direct sun and wind exposure on south and west facing walls wear mortar faster than shaded elevations.
- Original mortar type matters too. Older lime-based mixes are softer and wear differently than modern portland cement mortars.
If deterioration is limited to one wall, a chimney, or a section near a downspout, partial repointing usually makes sense. Widespread crumbling across multiple elevations is a sign to plan for a full repoint rather than chasing patches for years.
What Does the Repointing Process Actually Involve?
A proper repoint follows a specific sequence, and skipping steps is where most failures start.
- Rake out the old mortar to a depth of at least twice the joint width, commonly around 3/4 inch to 1 inch. Shallow raking is one of the most common causes of early repoint failure, since it leaves too little surface for new mortar to grip, according to masonry restoration guidance on raking depth and bonding.
- Clean the joint of dust and debris, then dampen the brick so it doesn't pull moisture out of the fresh mortar too fast.
- Pack new mortar into the joint in thin layers, compacting each one before adding the next.
- Tool the joint to match the original profile and compress the mortar for a tight seal.
- Cure the mortar slowly, keeping it damp and shaded for several days.
Pro Tip: Ask your contractor how deep they plan to rake the joints before work starts. If the answer is vague or shallower than about 3/4 inch, that's a red flag worth pushing back on.
Small patch jobs often wrap up in a day. Full elevations or chimneys typically run 3 to 7 days depending on access, scaffolding, and how closely the new mortar needs to match the old.
Does Mortar Type Really Matter for Repointing?
It matters more than most homeowners expect. Getting the mix wrong can damage brick that survived a century just fine.
Older masonry, especially anything built before the 1900s, was typically laid with lime-based mortar. It's softer and more breathable than modern mixes. Cement-rich mortar poured into those joints today creates a mismatch: the new mortar becomes harder than the surrounding brick. Since mortar is meant to be the sacrificial, flexible layer, a mortar that's too strong forces stress into the brick instead, and that's when you start seeing spalling and cracked brick faces.
Getting a good match involves a few checks:
- Visual comparison of color and texture against unaffected joints.
- Sample panels cured on-site before committing to a full job, so you can see how the color settles once dry.
- Lab or petrographic analysis for historic homes where an exact original mix matters for preservation accuracy.
Before hiring anyone, ask directly about mix proportions and whether they're matching your home's mortar strength, not just its color.
Should You DIY or Hire a Mason?
The scope of the damage decides this, not your comfort level with a trowel.
- DIY territory: hairline cracks under about 1/8 inch that have stayed the same size for a season, plus small, shallow gaps in a single joint or two.
- Call a pro when cracks are wider than 1/8 inch, growing, or arranged in stair-step or diagonal patterns.
- Call a structural engineer if you see bulging walls, interior dampness tied to a specific wall, or cracks that run through multiple courses of brick.
- Vet any contractor with a short checklist: proof of insurance, recent references, a sample patch before full commitment, a clear answer on mortar mix, and a written workmanship warranty.
A solid contractor vetting checklist is worth reviewing before you sign anything. Red flags include vague pricing, no written warranty, and reluctance to explain their mortar mix.
When Is the Best Time of Year to Repoint?
Mortar cures best in mild weather, which is why timing this project matters almost as much as doing it correctly.
- Ideal temperature range: roughly 40°F to 90°F, since extremes on either end interfere with proper curing, according to This Old House.
- Best seasons: spring and early fall in most climates, avoiding both summer's hot sun and winter's freeze.
- Curing practices: contractors often keep new mortar damp and shaded for several days after tooling.
- Weather to avoid: direct hot sun that dries mortar too fast, freezing temperatures that crack it before it sets, and heavy rain that washes it out.
How Can You Slow Down Future Repointing Needs?
A little seasonal attention goes a long way toward stretching that 25 to 50 year window closer to its upper end.
- Inspect after winter, checking for new cracks or loosened mortar following freeze thaw cycles.
- Fix gutters, flashing, and grading so water moves away from your walls instead of pooling against them.
- Avoid impermeable sealants, which trap moisture inside the wall rather than letting it escape, and stick to gentle cleaning methods over harsh pressure washing.
- Handle small touch-ups early, since a single deteriorating joint is a much smaller job than an entire wall.
Homeowners managing older properties often find that freeze thaw damage prevention starts with exactly this kind of routine check, not a major renovation. Pairing that with solid drainage planning around retaining walls and grade lines keeps water away from vulnerable joints in the first place.
A Practical Recommendation on Matching and Timing
Older homes deserve conservative choices. Match the original mortar's softness and breathability rather than defaulting to whatever mix is easiest to buy, and treat any structural crack as a reason to get an inspection, not a guess. Free estimates and a solid workmanship guarantee make that first call low-risk.
— Thomas
How Heritage Masonry & Brick Handles Repointing in Richmond
One common problem in repointing jobs is mismatched mortar that looks fine for a year and then damages the brick it was supposed to protect. A proper repointing job ideally starts with a mortar match assessed for strength and breathability, not just color.

Whether you're dealing with a single deteriorating joint or a chimney that's been shedding mortar for a decade, the approach stays the same: traditional technique, modern craftsmanship, and materials chosen to match what's already on your wall. Heritagemasonryandbrick offers free estimates and backs every job with a 5-year workmanship guarantee, so you're not gambling on whether the fix holds. If you spotted crumbling joints, recessed mortar, or a crack pattern that worried you while reading this, the next step is simple: request an inspection through the repointing and tuckpointing page and get a straight answer on what your wall actually needs.
Where to Learn More About Repointing Standards
For technical depth beyond this guide, ASTM E 2260 and Brick Industry Association guidance covers repointing definitions and mortar compatibility standards in detail.
Sources
- Repointing Brick Masonry (Brick Industry Association technical brief)
- Repointing guidelines — raking depth and bonding
- Keeping mortar compatible with historic masonry
- How to fix hairline cracks in mortar joints — Today's Homeowner
FAQ
How Do I Know If My Brickwork Needs Repointing?
Check for mortar that's crumbling, missing, or recessed more than a quarter inch, along with any active water intrusion inside the wall. Stable hairline cracks under 1/8 inch are usually low urgency, while wider or growing cracks and visible spalling point toward a professional inspection.
What Is the Average Cost to Repoint Brick?
Cost depends heavily on project size, whether it's a small patch or a full elevation, and how closely the mortar needs to match existing material. Richmond area pricing factors are covered in detail in this masonry repair cost breakdown, and Heritagemasonryandbrick provides free, project-specific estimates rather than a flat rate.
What Happens If You Don't Repoint Brick?
Water keeps entering through failed joints, which accelerates freeze thaw damage, corrodes interior brick faces, and can eventually reach structural elements like lintels and wall ties. What starts as a cosmetic issue often turns into a structural repair if it's ignored for years.
What Time of Year Is Best for Repointing?
Spring and early fall tend to work best in most climates, since mortar cures properly in the 40°F to 90°F range that This Old House recommends. Extreme heat dries mortar too fast, while freezing temperatures can crack it before it sets.