
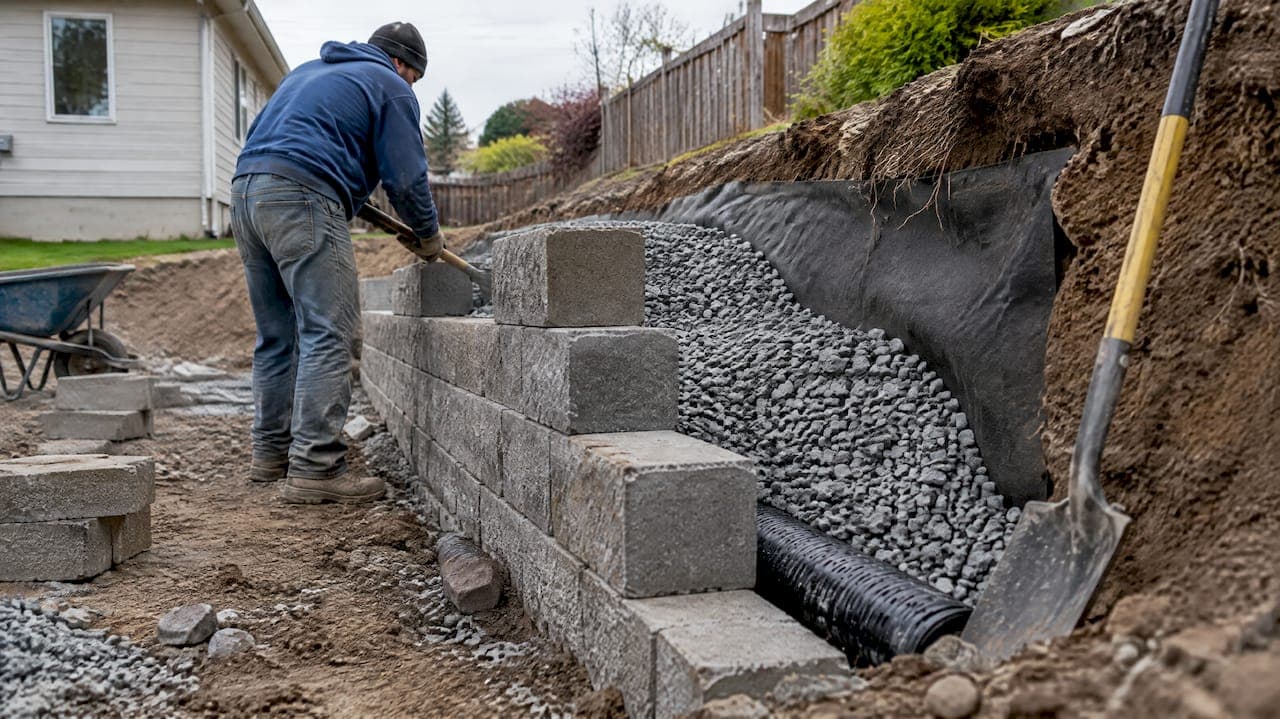
Use free-draining crushed stone or a well-graded structural aggregate with low fines, and treat drainage and compaction as the key decisions that determine whether your wall stands or fails. FHWA guidance calls backfill selection critical and recommends open-graded aggregate with a friction angle of 38 degrees or higher. We've built and repaired enough retaining walls in our masonry work to know that skipping these steps is the most common reason walls bulge, lean, or crack within a few seasons.
TL;DR:
- Choose angular, clean crushed stone with a friction angle of at least 38 degrees; keep nonplastic fines near zero unless testing supports up to 10%.
- Install a fabric wrapped perforated pipe in gravel, slope it to an outlet, and test water flow before backfilling; inspect the outlet after heavy rain.
- Use open graded stone and a wrapped drain in heavy clay or high groundwater; well graded aggregate may suit naturally free draining sandy sites.
- Place backfill in thin lifts and compact each one before adding another; keep heavy machinery farther back from the wall face.
- A low gravity wall on stable ground may suit DIY, but taller walls, slopes beside foundations, brick facing, and geogrid designs need professional review.
Table of Contents
- Recommended Backfill Materials and Key Specifications
- Designing Drainage That Actually Keeps Water Moving
- Compaction and Placement Rules That Prevent Settling
- Geotextiles, Geogrid, and Sheet Drains: What Each One Does
- A Step-by-Step Backfilling Workflow for Your Project Day
- Common Backfill Mistakes and How to Catch Them Early
- How Soil Type Behind the Wall Affects Your Material Choice
- Why Waterproofing the Wall Face Matters Alongside Backfill
- How Deep and How Wide Your Backfill Zone Should Be
- Keeping an Eye on Backfill and Drainage After the Work Is Done
- When to DIY and When to Call a Professional
- Professional Retaining Wall Help From Heritage Masonry and Brick
- FAQ
- Sources
Recommended Backfill Materials and Key Specifications
Not all backfill behaves the same way once it is wet and under load. The material you choose controls whether water passes through the wall system or builds up behind it, and that single factor decides most retaining wall failures.
Open-graded aggregate consists of crushed stone that is mostly one size, with large gaps between particles. Water moves through it quickly because there is nothing to clog the pores. Well-graded aggregate mixes particle sizes to lock together tightly, which gives more mass and shear strength but drains more slowly. For most residential retaining walls, open-graded crushed stone is the safer default because it resists hydrostatic buildup even when compaction is imperfect.
Fines content, the portion of material that passes the No. 200 sieve, is the detail many DIY builders miss. Research on structural backfill found that up to about 10% nonplastic fines may be acceptable in limited cases, but only with extra testing and added drainage measures, since both permeability and shear strength drop as fines increase. Unless you're running those tests, stay on the clean side of that range.
FHWA GRS-IBS design guidance recommends crushed, durable aggregate free of organic matter, with specific sieve limits, and calls for open-graded material in flood-prone or submerged locations. Practical sizing examples include AASHTO No. 5 and No. 89 gradations, with maximum grain sizes generally in the half-inch to 2-inch range for easy compaction. Angular, crushed particles interlock better than rounded river gravel, which gives the backfill mass more internal friction and resistance to sliding.
A few material rules are worth repeating on-site:
- Reject any aggregate with visible clay clumps, topsoil, roots, or organic debris mixed in.
- Keep stockpiled aggregate covered and off bare ground so it doesn't pick up fines before placement.
- Buy from a supplier who can state the gradation, not just "crusher run" or "fill dirt."
- Match your aggregate choice to drainage conditions: go open-graded near slopes, flood zones, or heavy clay soils.
Designing Drainage That Actually Keeps Water Moving
Water trapped behind a wall creates hydrostatic pressure, a lateral force that retaining walls are rarely engineered to resist. Drainage is what keeps that pressure from ever building, which is why it matters as much as the backfill material itself.
A standard perforated drain pipe, wrapped in filter fabric and set in a gravel envelope, should run along the base of the wall, sloped toward a daylight outlet or a storm drain connection. Check that outlet regularly. A blocked pipe turns a well-built wall into a water tank.
Research on maintainable drains found that conical drains penetrating into the backfill provide better drawdown than conventional weep holes, and they clog less over time because they can be flushed and inspected. Design charts tie drain size and spacing to groundwater height, with maximum spacing reaching 30 feet in some conditions. Larger drains can be spaced farther apart; smaller drains need tighter spacing to move the same volume of water. If you're relying on traditional weep holes in a brick-faced wall, our guide on weep holes in brick covers how to inspect and maintain them properly.
Filter fabric placement matters as much as the pipe itself:
- Choose a geotextile with enough permittivity to pass water freely while still retaining soil particles, following AASHTO filter compatibility methods.
- Wrap the drain pipe and gravel envelope completely, overlapping seams generously.
- Keep the fabric free of wrinkles and tears, since a torn section lets fines migrate straight into your drainage stone.
- Extend fabric up the back face of the wall where unit drainage fill meets native soil.
Pro Tip: Run a short test by pouring a bucket of water into your drain outlet before backfilling. If it doesn't exit quickly, fix the slope or the pipe before you bury it.
For a deeper look at full system design, our article on what a retaining wall drainage system actually needs walks through outlet placement and pipe sizing in more detail. Readers who want another contractor's take on installation sequencing can also review this homeowner's drainage installation guide.
Compaction and Placement Rules That Prevent Settling
Backfill that isn't compacted properly will settle on its own, usually unevenly, which pulls the wall out of alignment and opens gaps behind it. Getting the compaction right is mostly about patience and working in thin layers rather than one dump truck load at a time.
- Place backfill in thin lifts, then compact each lift fully before adding the next. Skipping this step is the single most common cause of post-installation settling.
- Follow the project specifications for compaction density. In practical terms, that means the soil should feel firm and resist a boot heel, not spring back or crumble.
- Use appropriate compaction equipment near the wall face, following the project specifications. Heavier ride-on equipment belongs only farther back, since its vibration can push the wall itself out of position.
- When working with block retaining wall units, place and compact unit drainage fill inside the block cores according to the manufacturer's spec before stacking the next course.
Rushing compaction to finish a weekend project is the shortcut that costs homeowners the most in repairs down the road.
Geotextiles, Geogrid, and Sheet Drains: What Each One Does
Geosynthetic products used in retaining wall projects solve different problems. Mixing them up, or skipping one where it's needed, is a common source of confusion for first-time builders.
A geotextile filter fabric separates soil layers and keeps fine particles from migrating into drainage stone, without adding strength. A geogrid is a reinforcement layer, usually a grid of high-strength polymer strips, that ties the wall face to the backfill mass and resists the soil's pull outward. A geocomposite sheet drain is a thin drainage layer, often a dimpled core wrapped in fabric, used where space is tight and a full gravel drainage zone isn't practical.
Placement basics worth following:
- Orient the geogrid's strong axis perpendicular to the wall face, since that's the direction carrying the load.
- Lay geotextile fabric flat and wrinkle-free, with generous overlap at every seam.
- Keep sheet drains continuous from top to outlet. A gap anywhere in the run defeats the purpose.
- Reserve geogrid for engineered, taller, or surcharge-loaded walls. A short gravity wall on stable ground generally doesn't need it.
If your project calls for geogrid reinforcement, that's usually the point where a structural engineer or an experienced masonry contractor should review the plan before you dig.
A Step-by-Step Backfilling Workflow for Your Project Day
Following the same order every time keeps a backfill job from turning into guesswork halfway through.
- Stage materials first. Keep crushed aggregate dry, covered, and separated from topsoil or excavated spoil so nothing gets mixed in by accident.
- Install drainage components. Set the perforated pipe, wrap it in filter fabric, backfill the trench with gravel, and confirm the outlet runs freely before covering anything else.
- Fill wall cores and unit drainage zones. For block systems, place and compact drainage fill inside the units per the manufacturer's instructions before moving to the open backfill zone.
- Backfill in lifts. Place backfill in thin lifts, compact each lift, and install any geogrid layers called for in your design at their specified elevations.
- Grade the surface. Finish with a thin cap of low-permeability soil or topsoil, sloped away from the wall, so surface water doesn't pool and soak back down into your drainage zone.
Pro Tip: Photograph each lift before you cover it. If a problem shows up later, those photos tell you exactly which layer to dig back into.
Common Backfill Mistakes and How to Catch Them Early
Most retaining wall failures give warning signs well before the wall actually collapses. Catching them early is far cheaper than rebuilding.
- A bulging or leaning wall face usually points to hydrostatic pressure from a clogged or missing drain.
- Pooling water at the wall's base or visibly soaked backfill means the drainage system isn't moving water out fast enough.
- Uneven settlement or gaps opening at the top of the wall often trace back to under-compacted lifts.
- Vegetation or dark staining on the wall face can signal organic material left in the backfill, breaking down and shifting over time.
Quick fixes include clearing a blocked outlet, adding a supplemental drain, or recompacting a suspect lift before it causes more movement. For brick-faced retaining walls specifically, our guide to brick retaining wall repair covers what homeowners should expect from an assessment. A wall that's visibly leaning or cracking needs a structural evaluation soon. Waiting usually turns a repointing job into a full rebuild.
How Soil Type Behind the Wall Affects Your Material Choice
The native soil you're backfilling against matters as much as the aggregate you bring in. Heavy clay soils hold water and expand when saturated, which pushes harder against a wall and makes drainage design non-negotiable rather than optional. Sandy or silty native soils drain faster on their own but can still wash fines into your aggregate zone if there's no filter fabric separating the two.
If your site sits on expansive clay, lean toward open-graded crushed stone with a well-wrapped drain system, since you're fighting both water pressure and soil expansion at once. On naturally free-draining sandy sites, a well-graded aggregate may perform fine with a simpler drainage setup, though a filter fabric layer still protects against long-term fines migration.
Slope and groundwater behind the wall change the equation too. A wall cut into a hillside with a high water table needs more aggressive drainage than one holding back a flat, well-drained yard. When in doubt, treat the native soil as part of your design, not just the hole you're filling.

Why Waterproofing the Wall Face Matters Alongside Backfill
Good backfill and drainage reduce the water pressure behind a wall, but they don't stop every drop of moisture from reaching the wall material itself. A damp-proofing or waterproofing membrane on the back face of the wall adds a second layer of protection, especially for brick, block, or poured concrete walls where moisture intrusion leads to spalling, efflorescence, or freeze-thaw cracking over time.
Pairing drainage with waterproofing matters most in climates with hard freezes, since trapped moisture that freezes and expands inside masonry causes damage drainage alone can't prevent. For brick retaining walls specifically, matching the right mortar and sealing approach to the existing material is part of what keeps a repair durable rather than temporary.
Think of waterproofing as the backup system: drainage moves bulk water away, and the membrane handles what seeps through before the drainage layer catches it.
How Deep and How Wide Your Backfill Zone Should Be
A common question is how much backfill depth and slope is actually enough. As a general rule, the free-draining aggregate zone should extend a consistent depth back from the wall face, often in the range manufacturers specify for their block systems, rather than tapering to a thin sliver of gravel against the wall.
Behind that aggregate zone, the final grade should slope gently away from the wall, never toward it. A grade that tilts back toward the structure sends surface runoff straight into your backfill, overwhelming the drainage system you just built. A slope of a few percent away from the wall, carried out several feet, is usually enough to keep surface water moving in the right direction.
Depth and slope decisions both come back to the same principle: water needs a clear, uninterrupted path away from the wall, both through the ground and across its surface.
Keeping an Eye on Backfill and Drainage After the Work Is Done
A properly built retaining wall still benefits from occasional attention. Check drain outlets after heavy rain to confirm water is actually exiting and not backing up. A trickle where you expect a steady flow can mean a partial blockage starting to form.
Walk the top of the wall once or twice a year and look for new gaps, settling, or soil washing out from behind cap units. Small signs caught early, like a slight dip in the grade or a weep hole that's gone quiet, are far easier to address than a wall that's already begun to lean. Keeping vegetation and root growth away from the drainage zone also helps, since roots can block pipes or displace fabric over years.
Routine inspection costs nothing but a few minutes, and it's the cheapest insurance against a repair bill that grows the longer a drainage problem goes unnoticed.
When to DIY and When to Call a Professional
A low gravity wall built from stacked stone or block, on stable ground, with a simple drain pipe and gravel backfill, is a reasonable weekend project for a careful homeowner. Taller walls, brick-faced structures, engineered geogrid designs, or anything holding back a slope near a foundation call for professional judgment. Our masonry work has shown us that the walls which fail are rarely the ones built too simply. They're the ones where drainage or compaction got rushed. If you're unsure which category your project falls into, an estimate from a contractor costs you nothing and tells you where you stand.
— Thomas
Professional Retaining Wall Help From Heritage Masonry and Brick
If your retaining wall project involves structural backfill, brick facing, or drainage design beyond a simple gravel trench, that's where our team steps in. We install and repair retaining walls throughout our service area.

Every estimate is free, and every completed job carries our 5-year workmanship guarantee, so you know the material matching and craftsmanship hold up long after we leave the site.
- We build and repair retaining walls.
- Free estimates mean you can compare options before committing to a project.
- Our 5-year workmanship guarantee covers the labor and materials on every retaining wall we build or repair.
Request an estimate through our retaining walls and masonry services page and we'll walk your site with you before any work begins.
FAQ
What soil to use for backfill?
Use free-draining crushed stone or a well-graded aggregate with low fines rather than native soil, clay, or topsoil. FHWA guidance recommends open-graded aggregate with a measured friction angle of 38 degrees or higher for structural backfill.
How can I fill gaps in my retaining wall?
Small gaps from settling are usually fixed by removing the loose material, adding clean compacted aggregate in thin lifts, and checking that the drainage system below is still working. If gaps keep reappearing or the wall face is shifting, that points to a drainage or compaction failure that needs a closer look rather than a quick patch.
How to set up drainage behind a retaining wall?
Install a perforated pipe wrapped in filter fabric, bedded in a gravel envelope, and sloped to a daylight outlet or storm drain. Research on maintainable drains found that conical drains penetrating into the backfill outperform standard weep holes and resist clogging better over time.
Can I backfill a retaining wall with sand?
Sand alone generally isn't recommended because it lacks the angular interlock and shear strength of crushed stone, and fine sand can migrate and clog drainage systems without a filter fabric barrier. A well-graded structural aggregate or crushed stone is the more reliable choice for both stability and drainage.
How much backfill material do I need behind a retaining wall?
The amount depends on your wall height, the manufacturer's specified aggregate zone depth, and the length of the wall, so it's calculated per project rather than from a single rule of thumb. A contractor or supplier can calculate volume once your wall dimensions and drainage zone depth are set.
Sources
- Fhwa
- Effects of Fines Content on Hydraulic Conductivity and Shear Strength of Granular Structural Backfill
- Design of Maintainable Drains for Earth Retaining Structures Final Report and Design Guide