
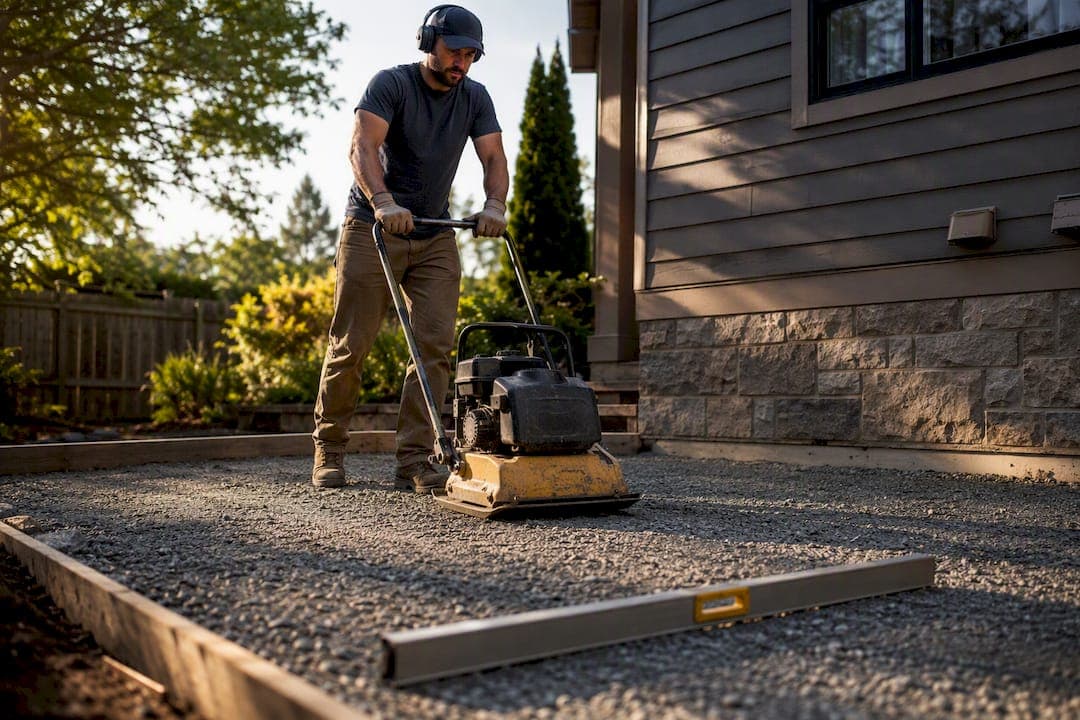
For a durable pedestrian patio, build a 4–6" compacted gravel base plus a 1" bedding sand layer, compact the gravel in 2–3" lifts, and slope the assembly 1/8"–1/4" per foot away from structures. Call 811 before you dig, and over-excavate the perimeter to give edge restraints solid footing. Skip any one of these steps and you're setting up a patio that heaves, settles, or dumps water toward your foundation within a few seasons.
TL;DR:
- Proper base preparation requires a compacted gravel layer of 4 to 6 inches, built in lifts, to prevent future heaving or settling.
- Excavation must include over-excavation beyond the finished edge and thorough removal of organic matter to ensure stability and proper drainage.
- A stable, well-sloped subgrade and a careful drainage plan are essential, especially on clay soils or properties with existing water flow issues.
- Edge restraints should be installed into solid, over-excavated material to prevent shifting and spreading of pavers over time.
- DIY projects often fail due to skipping lifts, inadequate drainage, or poor subgrade, making professional assessment advisable for problematic sites.
Table of Contents
- What Does Proper Patio Base Preparation Involve?
- How Do You Excavate and Prepare the Subgrade?
- How Thick Should the Gravel Base Be?
- How Do You Screed and Set the Bedding Sand?
- How Much Should a Patio Slope for Drainage?
- What Edge Restraints and Finishing Steps Lock a Patio in Place?
- What a Mason Sees When Patio Bases Fail
- Why the Depth Numbers Matter More Than the Tools You Use
- Get a Free Estimate for Your Patio Project
- Sources
- FAQ
What Does Proper Patio Base Preparation Involve?
Before a shovel touches the ground, you need an accurate layout and a firm grasp of your final elevations. Call 811 first. It's free, it's fast, and it keeps you from slicing into a gas line or irrigation main while excavating a patio footprint.
Once utilities are marked, check local permitting rules and any HOA restrictions on hardscaping. Some Richmond area jurisdictions require permits for patios over a certain size or near property lines, so it's worth a quick call to your local building office.
Layout comes next:
- Drive stakes at the corners and use the 3-4-5 method to square the footprint (measure 3 feet on one line, 4 feet on the other, and the diagonal should read 5 feet).
- Run string lines between stakes at your intended finished height to visualize grade before you dig.
- Calculate your excavation depth by adding paver thickness, 1 inch of bedding sand, and 4 to 6 inches of compacted base together.
- Plan to over-excavate the perimeter slightly beyond the finished edge. Contractors typically extend the excavation an extra distance equal to the base depth so edge restraints anchor into solid material instead of loose soil, a detail confirmed in Unilock's base preparation guide.
Get this math right now, and every later step gets easier.
How Do You Excavate and Prepare the Subgrade?
The subgrade is the native soil beneath everything else, and it needs to be stable before you add a single scoop of gravel. Rushing this stage is where a lot of DIY patios go wrong.
- Calculate total dig depth. Add your paver thickness, 1 inch of bedding sand, 4 to 6 inches of compacted gravel base, and a little extra for compaction settling.
- Strip all organic material. Remove grass, roots, topsoil, and any buried debris. Organic matter decomposes over time and creates voids that cause sinking.
- Compact the exposed subgrade. Run a plate compactor over the native soil before adding any base material. This firms up the foundation everything else sits on.
- Test for soft or saturated spots. If the soil squishes underfoot or pools water after a rain, address drainage first or bring in extra base material to compensate.
- Lay geotextile fabric where needed. On clay soils, poorly draining sites, or areas with a high water table, a layer of geotextile fabric between subgrade and gravel keeps the two from mixing over time, a practice detailed in this ground-prep guide for lasting patios. Without it, clay can migrate up into your gravel base and destroy its load-bearing structure within a couple of freeze-thaw cycles.
Don't skip step three. A compacted subgrade is the difference between a patio that stays flat and one that dips at the edges.
How Thick Should the Gravel Base Be?
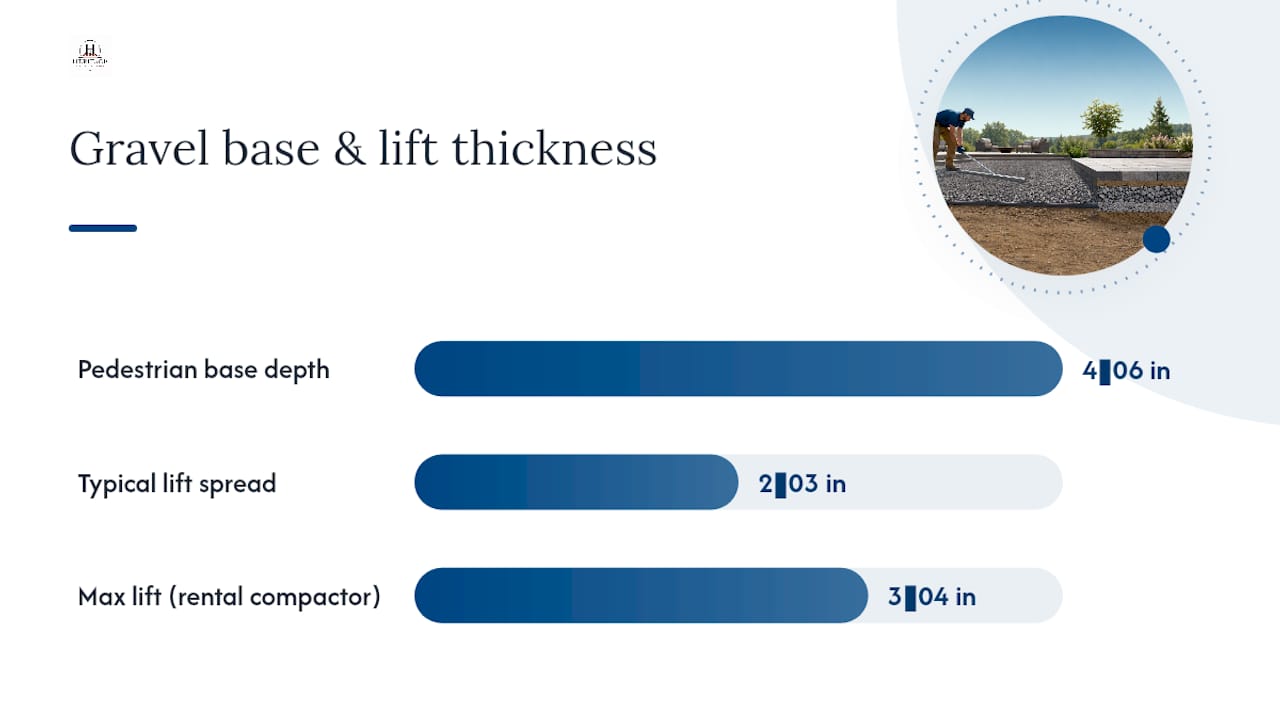
Pedestrian patios need 4 to 6 inches of compacted, dense-graded crushed stone, sometimes called 3/4" minus or crusher run, according to Lowe's patio and walkway planning guide. Cold climates with regular freeze-thaw cycles, clay-heavy soil, or any patio that will see vehicle weight should push toward the higher end of that range, or beyond it for driveways.
The material matters as much as the depth. Angular, dense-graded crushed stone locks together when compacted, forming a stable, load-bearing mat. Round pea gravel does the opposite. It shifts under pressure and never achieves the interlock that makes a base structurally sound, a distinction Western Interlock's paver base guide makes clear.
Build the base in lifts instead of dumping it all at once:
- Spread 2 to 3 inches of crushed stone, then compact with a plate compactor.
- Add the next lift and compact again, checking slope with each pass.
- Limit lifts to no more than 3 to 4 inches even with heavier rental equipment. Most compactors only achieve full density that deep, a limit Unilock's installation guide points out directly.
- If the crushed stone is bone dry, mist it lightly before compacting. A little moisture helps particles bind instead of bouncing apart under the plate.
Pro Tip: A small spacer under a 4-foot level makes it easy to check consistent slope across the base while you compact each lift. Set it once and reuse it at every checkpoint so you're not guessing.
Compacting the entire depth in a single pass is one of the most common DIY mistakes. The surface looks compacted, but the material underneath stays loose, and that hidden layer is exactly where future settling starts.
How Do You Screed and Set the Bedding Sand?
The bedding layer is a thin leveling course that lets pavers seat evenly; sand alone does not carry load like compacted gravel.
- Spread bedding sand over the compacted gravel base as recommended by your paver manufacturer.
- Use screed rails set to achieve a consistent depth, typically about 1 inch.
- Screed sand flat and fill any grooves left when removing rails.
- Avoid disturbing the screeded sand before laying pavers to prevent uneven surfaces.
Do not compact the bedding sand before laying pavers. That step comes later, once the pavers themselves are in place. Compacting the full assembly at that point settles the sand into the gaps beneath and between the pavers, locking everything together. Bedding sand and polymeric joint sand are different products used at different stages. Bedding sand supports the pavers from underneath, while polymeric sand fills the joints on top and hardens to resist weed growth and ant intrusion.
How Much Should a Patio Slope for Drainage?
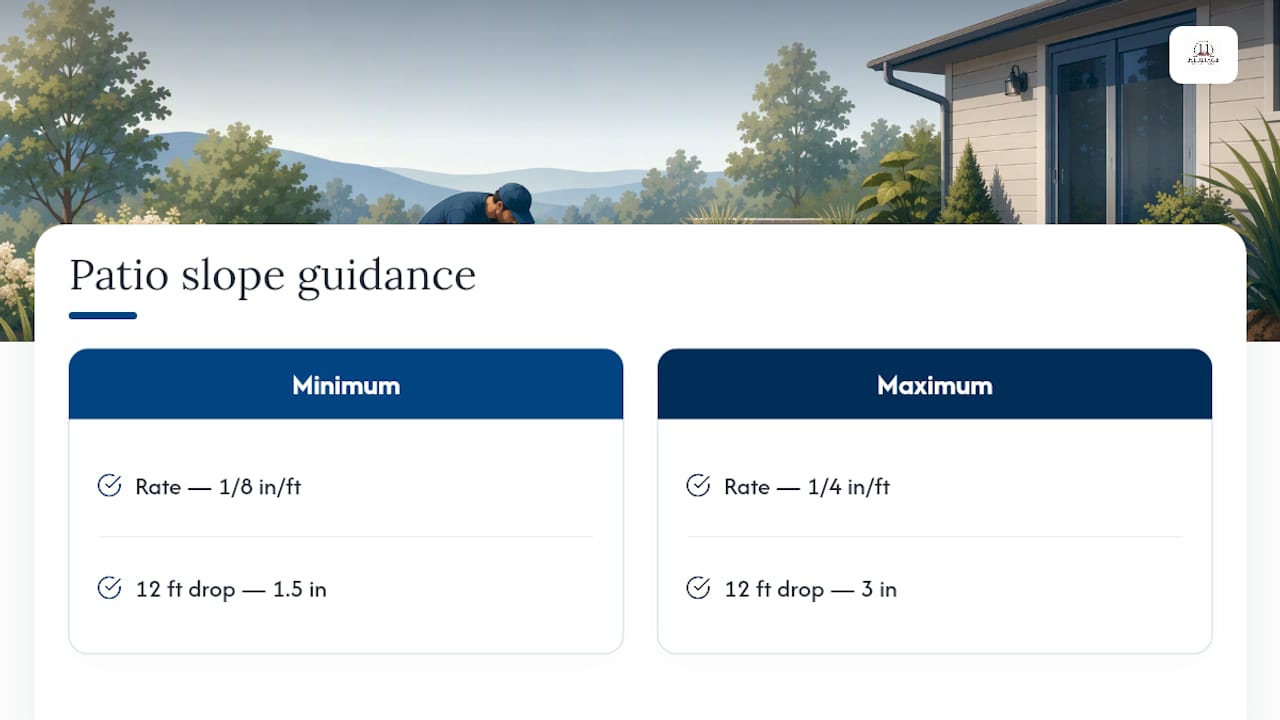
A patio needs to shed water away from your house at a rate of roughly 1/8 to 1/4 inch of drop per linear foot, according to PNNL's Building America Solution Center. On a 12 foot span, that works out to a 1.5 to 3 inch drop from the house side to the outer edge.
Check this slope constantly, not just once. Run a string line from a fixed point near the house to the outer edge, then use a long level to confirm consistent pitch at the subgrade stage, again after the gravel base, and once more after the bedding sand is screeded.
If your existing yard grade already funnels water toward the foundation, a patio built on top of that slope won't fix the underlying problem. In that case, you're looking at increasing the pitch further, adding a channel drain along the house side, or getting a professional opinion. Persistent pooling after installation usually points to a drainage issue deeper than the patio itself. Our guide to diagnosing brick patio drainage walks through what to check first.
What Edge Restraints and Finishing Steps Lock a Patio in Place?
Edge restraints keep the assembly from creeping outward under foot traffic and freeze-thaw pressure. Plastic or metal restraints anchored into the compacted base provide lateral support. Anchor restraints should be installed into stable material beyond the patio edge for effectiveness.
- Run the plate compactor over the finished paver surface using a protective pad to avoid chipping, working in overlapping passes across the whole patio.
- Sweep sand into the joints, compact again, and repeat until the joints stay full.
- Check edge restraints yearly and top off joint sand as it settles or washes out.
What a Mason Sees When Patio Bases Fail
Most patio failures experts get called to repair trace back to three mistakes: skipped compaction lifts, undersized edge support, and the wrong aggregate underneath. Homeowners often compact once at full depth instead of in lifts, or they skip geotextile fabric on clay soil and wonder why the patio heaves every winter.
Over-excavating the perimeter beyond the finished patio edge provides stable material to anchor edge restraints and meet slope rules effectively. Skipping this step risks edge restraint failure and subsequent spreading and shifting of pavers.
If your yard has heavy clay soil, a high water table, or grading that already sends water toward the foundation, that's usually where DIY becomes a bigger job than a Saturday project should be. Complex drainage work and near-foundation excavation are exactly where a contractor's judgment call saves you a rebuild later.
Some masonry repair companies back installations with a workmanship guarantee. Our brick patio cost guide breaks down what materials and labor typically run if you're weighing DIY against hiring out.
Why the Depth Numbers Matter More Than the Tools You Use
Homeowners tend to obsess over which compactor to rent or which paver pattern looks best, and those choices matter less than getting the depth and lift sequence right. The research on this is consistent across every serious installation guide: 4 to 6 inches of compacted gravel, 1 inch of bedding sand, and slope within that 1/8 to 1/4 inch per foot band. Miss those numbers and no amount of careful paver placement will save the project.
Where conventional advice falls short is in treating compaction as a single event instead of a repeated check. Compacting in lifts only works if you verify slope and density after every lift, not just at the end. That's the step most DIY guides gloss over, and it's the one that separates a patio that lasts fifteen years from one that needs relaying in three.
If there's one thing to prioritize first, it's the subgrade and drainage plan, before you even think about aggregate. A patio built on a well-drained, properly sloped subgrade forgives small mistakes elsewhere. One built on saturated clay with no fabric barrier won't forgive much of anything.
— Thomas
Get a Free Estimate for Your Patio Project
Some patios are a manageable weekend project. Others involve heavy clay, a slope that already drains toward your foundation, or excavation close enough to the house that a mistake gets expensive fast. That's where a masonry professional can offer a trained assessment of what your specific soil, grade, and drainage actually require before the first shovel goes in.

Some masonry contractors handle patio and walkway installation, drainage corrections, and custom brickwork, matching materials and grading each project to the site rather than a one-size-fits-all spec. If your yard has standing water, a steep grade change near the foundation, or clay soil that never quite dries out, professional grading and base work usually costs less over time than repairing a failed DIY patio. Request a free estimate and we'll walk your site, talk through what your soil and slope actually need, and give you a straight answer on scope and cost before you commit to anything.
Sources
- Patio slabs, porch slabs, walkways, and driveways: slope away from house (BASC/PNNL)
- Planning for a paver patio or walkway (Lowe's How-To)
- Do's and Don'ts of Paver Installation: Step 2 of 3 – Base Preparation (Unilock)
- Base for Pavers: How to Prep & Lay a Paver Base | DIY (Western Interlock)
FAQ
Can I skip the gravel and just use sand under pavers?
No. Sand alone can't support the load pavers carry and will shift and settle unevenly; a compacted gravel base of 4 to 6 inches is what actually bears the weight, with sand serving only as a thin leveling layer on top.
Can I lay pavers directly on dirt?
No. Bare soil compresses unevenly under foot traffic and moisture, causing pavers to sink and shift within one season; you need a compacted gravel base and a screeded bedding sand layer first.
Can you lay a patio directly on soil?
Not for a lasting result. Native soil needs to be excavated, compacted, and topped with dense-graded crushed stone before any bedding sand or pavers go down, especially on clay or poorly draining sites where geotextile fabric adds extra insurance.
Can I lay patio stones directly on sand without gravel?
You can, but it won't hold up. Without a compacted gravel base underneath, sand shifts and washes out over time, leading to uneven pavers and pooling water within a year or two.
How deep should I dig for a patio?
Add your paver thickness, 1 inch of bedding sand, and 4 to 6 inches of compacted gravel base together, then account for extra depth lost to compaction, and over-excavate the perimeter edge for restraint support.